|
The Feed
Sack Store at the Shadow J Ranch proudly
presents |
|
Upcycled
Feed Sack Sewing
Patterns For Tote Bags |
|
Helping save the
earth one feed sack at a time |
|
|
|
|
|
By C. A.
Johns & J. F. Johns January 2015 |
|
|
Woven polypropylene feed sacks are a durable fabric often covered with stunning natural images. Upcycling feed sacks into stunningly beautiful and yet extremely practical products will reduce the amount of non-biodegradable feed sacks in our landfills. This is a book of tote bag sewing patterns designed to use woven polypropylene feed sacks as the fabric.
Contents
Thank
you for helping save the earth one feed sack at a time.
Go
Green and Upcycle Feed Sacks
Make
sure the bag is Woven Polypropylene
Cutting
Woven Polypropylene Fabric
Ironing
Woven Polypropylene Fabric
The Shadow J Ranch is dedicated to making the world a better place for humans and animals. Our efforts honor the natural partnership between humans and animals while developing environmentally responsible products that you can enjoy while saving the earth!
Please let us know if you have any questions or suggestions. Our websites are:
http://www.feedsackstore.com and http://www.shadowj.com.
Please feel free to contact us via email: trailboss@shadowj.com.
Please follow our upcycling efforts on social media and feel free to share your experiences. Our Twitter account is @FeedSackStore. Our Facebook and Pinterest accounts are The Feed Sack Store.
Upcycled Feed Sack Sewing Patterns
for Tote Bags
Reproduction or use without express permission, of editorial or pictorial content, in any manner is prohibited. While every precaution has been taken in the preparation of this book, the author and publisher assume no responsibility for errors or omissions. Neither is any liability assumed for damages resulting from the use of the information contained herein.
Copyright © 2015 by J. F. Johns, Tioga, Texas
All rights reserved.
ISBN: 978-1-312-95328-4
Printed in the United States of America.
Woven polypropylene feed sacks are a durable material often covered with stunning images of horses, poultry, ranch animals, song birds, and wildlife. These sacks are being thrown into the garbage contributing to the growing landfill crisis. We would like to encourage everyone to upcycle feed sacks as part of their routine recycling efforts.
Upcycling feed sacks into useful products will reduce the amount of non-biodegradable feed sacks in our landfills. Products made of upcycled woven polypropylene fabric are extremely strong, lightweight, waterproof, and easily wipe clean with a damp cloth.
We have developed patterns specifically for woven polypropylene feed sack fabric to enable everyone to able to create products that are stunningly beautiful and yet extremely practical. The custom and recycled nature of each handmade upcycled feed sack product only adds to its charm and allure.
Make sure
the bag is Woven Polypropylene
These patterns are designed to use woven polypropylene feed sack as the fabric. Plastic, paper, and loosely woven mesh bags are not appropriate for these patterns. A woven polypropylene feed sack is made of tightly woven polypropylene threads and you can clearly see the weave pattern on the bag as shown in the following picture. For more information, check out http://www.wovenpolypropylene.com.
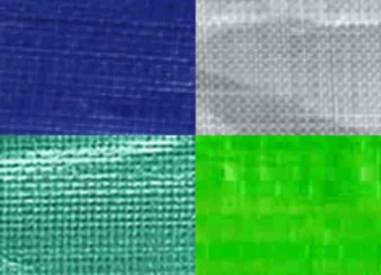
Woven polypropylene sacks vary greatly based on the type of feed in the sacks and the manufacturing process. The vivid images can be printed directly on the woven polypropylene or on a laminated layer adhered to the woven polypropylene. The tightness of the weave varies and some sacks have a waterproof coating for moist foods.
To
Flatten or Not
Some patterns require the feed sack to be flattened while other patterns use the feed sack in its original bag shape (un-flattened). If the bag is to be used un-flattened, then simply remove all strings and tape from the top and bottom of the feed sack.
If the bag is to be flattened:
Remove all strings and tape from the top and bottom of the feed sack.
Tear open or cut the seam running lengthwise down the back of the feed sack.
The feed sack should now lay flat in a single layer of fabric.
Cleaning
Feed Sacks
Cleaning can be the most challenging aspect of feed sack preparation. The inside and outside of the feed sacks must be cleaned thoroughly prior to cutting out the pattern pieces or sewing. An un-flattened bag needs to be turned inside out to thoroughly clean the fibers that may hold feed remnants. Use soap, bleach, and warm water to clean the fibers of the woven polypropylene. A stiff brush can be used to remove any mold or dirt in the fibers. Stubborn stains and mold may require the use of a strong mold and mildew cleaner. Dry the bags thoroughly prior to use.
Planning
a project
The beauty of the final product can be greatly improved by selecting feed sack imagery that corresponds to the size and shape of the final product.
Read all pattern instructions prior to beginning a project. This will help you understand the best way to use the vivid images on the feed sack to create your product.
Cutting Woven
Polypropylene Fabric
Woven polypropylene feed sacks can be cut with regular scissors or a rotary cutting mat and blade.
Ironing
Woven Polypropylene Fabric
Feed sacks often have wrinkles that can be ironed out. Woven polypropylene feed sacks CANNOT be ironed with the iron directly on the fabric. A damp towel must be placed between the fabric and the iron.
Pins and
Needles
Pinning woven polypropylene fabric can be a real challenge. The fabric is very stiff and regular pins bend and often break. Binder clips and clothes pins are easier to use on corners and straight seams than straight pins.
It can also be difficult to remove straight pins from the fabric. Straight pins with a ball head are easier to grasp and remove than headless pins.
Sewing machine needles often bend and break when sewing multiple layers of woven polypropylene fabric. To reduce needle stress, sew slowly across changes in the thickness of the fabric being sewn and make sure the presser foot remains as level as possible.
Thread
Woven polypropylene fabric should be sewn using 100% polyester thread. Cotton threads or a blend of polyester and cotton thread tends to fray. Seams sewn with cotton or cotton blend threads tend to break apart under heavy loads in tote bags.
Crisp
Seams
The look of the finished product is greatly enhanced if seams are pressed flat with your hands. Feed sack fabric is stiff and can hold very crisp seams pressed with your hands. The pattern instructions indicate areas where pressing seams flat will improve the sewing process or make the product look better.
Inspire your life with the vivid images of natural beauty found on woven polypropylene feed sacks. Upcycled feed sacks are an excellent fabric for making tote bags of all sizes and shapes. The fabric is exceptionally strong for safely carrying heavy loads and extremely easy to keep clean and sanitary with a damp cloth and household cleansers.
We have created four easy tote bag patterns to encourage everyone to recycle their feed sacks into beautiful and practical custom works of usable art. The first two patterns are for wine tote bags. The first pattern is a simple flat wine tote bag that is easy to fold up and put into your purse. The second wine tote bag pattern is a little more complex with a square box bottom. The third pattern is a large tote bag suitable for too many household purposes to enumerate; just use your imagination. The fourth pattern is a yoga mat tote bag.
All you need to get
started is some basic sewing skills and a few woven polypropylene feed
sacks. Use your imagination to add
custom touches and trims to the patterns.
And remember to have fun.
Flat Wine
Tote
This pattern makes a flat wine
tote bag from woven polypropylene feed sack fabric.
The finished wine tote bag
dimensions are 9 inches wide and 12 inches high with a handle that is 1 inch
wide and extends 6 inches above the bag.
Instructions
Step 1. Clean
and flatten the feed sack using the Feed Sack Preparation Instructions.
Step 2. Cut out
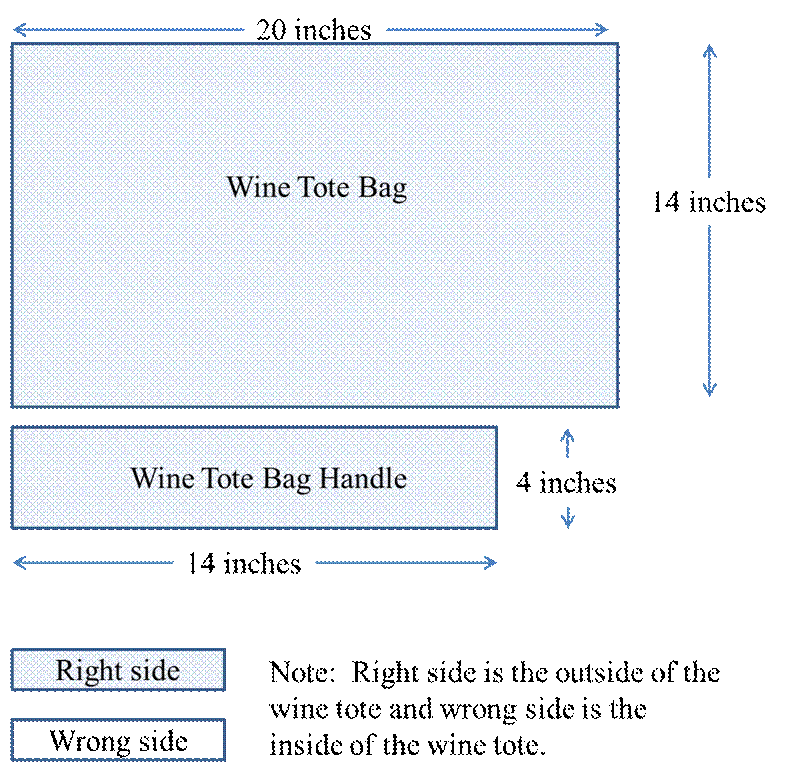
the wine tote bag and handle using the following dimensions.
Step 3. Make the wine tote bag handle using the following steps.
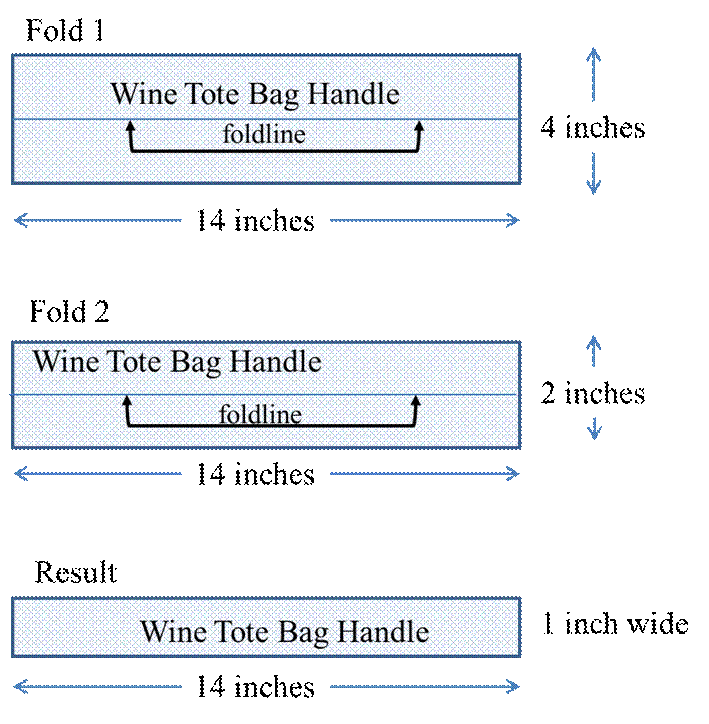
A. Fold 1: Fold
the handle in half lengthwise with the wrong sides together. The handle
will now be 14 inches long and 2 inches wide.
B. Use
your hands to press the fold flat.
C. Fold
2: Fold each unfinished edge of the
handle in half with wrong sides together to produce a handle that is 14 inches
long and 1 inch wide.
D. Use
your hands to press the folds flat.
E. Top
stitch the length of the handle. The top
stitching can be whatever pattern is desired.
At a minimum, a straight stitch should be used in the middle of the
handle to secure the folded sides of the handle.
Step 4. Make the wine tote bag body using the following steps.
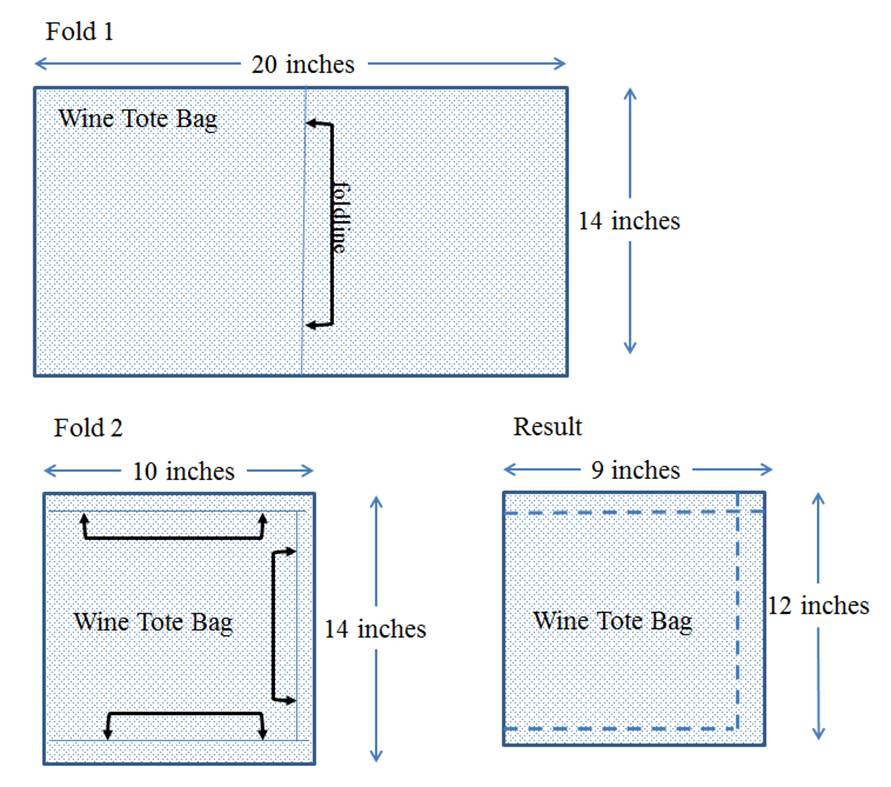
A. Fold
1: Fold the bag in half with the wrong
sides together. The bag will now be 14
inches long and 10 inches wide.
B. Use
your hands to press the fold flat.
C. Measure
1 inch from each unfinished edge of the bag for fold lines.
D. Fold
2: Fold 1 inch of each unfinished edge
of the bag with wrong sides together to produce a bag that is 12 inches long
and 9 inch wide.
E. Use
your hands to press the folds flat.
F. Lay
the bag flat and top stitch a seam ½ inch from the top of the bag.
G. If
desired, add fringe or other trim to the wine bag.
H. Pin
the side and bottom of the bag with wrong sides together and top stitch a seam
½ inch from the side and bottom of the bag.
Step 5. Attach the handle to the wine tote bag.
A. Measure
and mark 1 inch from each end of the tote bag handle.
B. Measure
and mark the center of the top of the front and back of the tote bag. The handle will be attached at the center of
the front and back of the bag.
C. Place
1 inch of the handle inside of the front of the bag and pin it in place at the
center mark.
D. Use
at least two rows of top stitching to secure the handle to the front of the
bag.
E. Place
1 inch of the handle inside of the back of the bag and pin it in place at the
center mark.
F. Use
at least two rows of top stitching to secure the handle to the back of the
bag.
G. Here
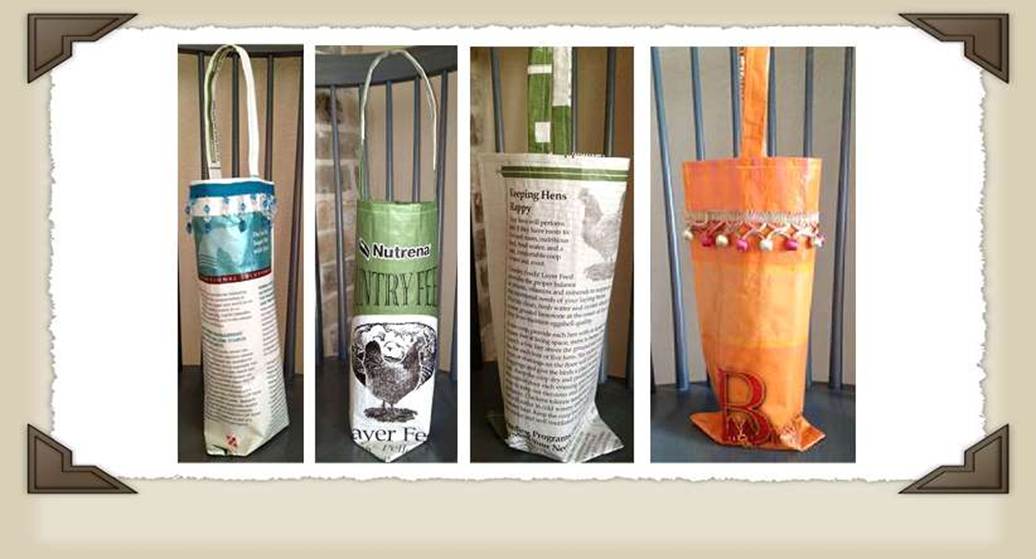
are some examples of finished wine tote bags.
Square Wine Tote
This pattern makes a wine
tote bag using woven polypropylene feed sack fabric. This tote bag has a square box bottom.
The finished wine tote bag
dimensions are 4 inches wide and 12 inches high with a handle that is 1 inch
wide and extends 8 inches above the bag.
Instructions
Step 1. Clean and flatten the feed sack using the Feed Sack Preparation Instructions.
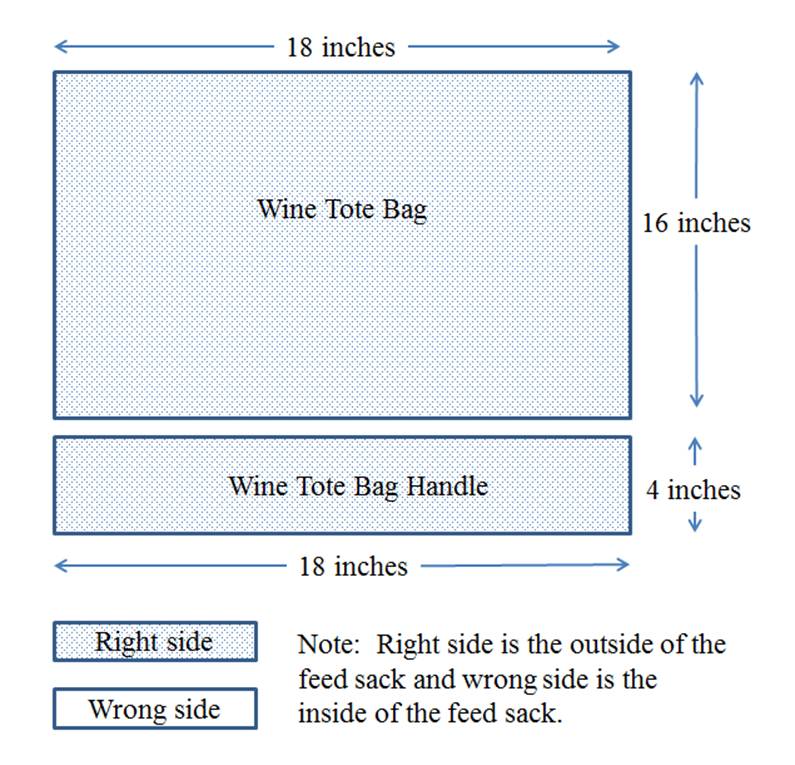
Step 2. Cut out the wine tote bag and handle using
the following dimensions.
Step 3. Make the wine tote bag handle using the
following steps.
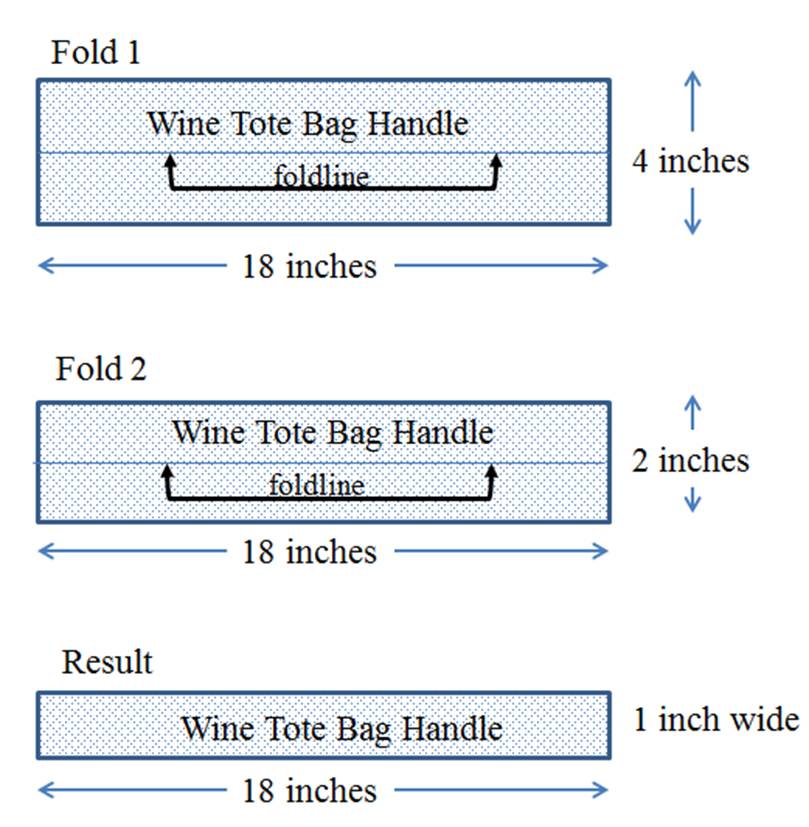
A. Fold
1: Fold the handle in half lengthwise
with the wrong sides together. The
handle will now be 18 inches long and 2 inches wide.
B. Use
your hands to press the fold flat.
C. Fold
2: Fold each unfinished edge of the
handle in half with wrong sides together to produce a handle that is 18 inches
long and 1 inch wide.
D. Use
your hands to press the folds flat.
E. Top
stitch the length of the handle. The top
stitching can be whatever pattern is desired.
At a minimum, a straight stitch should be used in the middle of the
handle to secure the folded sides of the handle.
Step
4. Make the wine tote bag body using the
following steps.
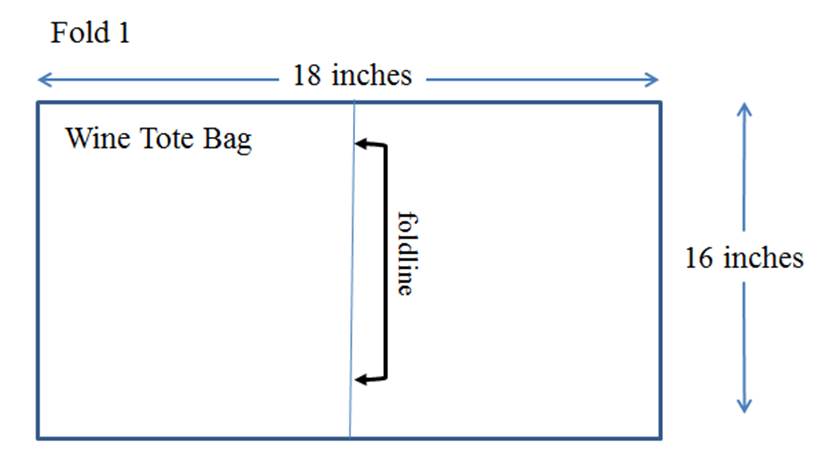
A. Fold 1: Fold the bag in half with the right sides together. The bag will now be 16 inches long and 9 inches wide. The bag is wrong side out.
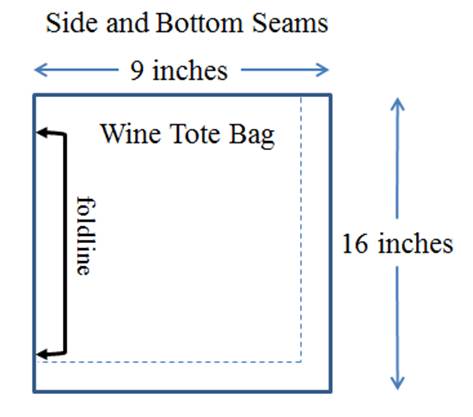
B. Measure
and mark 1 inch from unfinished side and bottom edge of the bag.
C. Stitch
the side and bottom seams. A double seam
can be used for a sturdy seam.
D. With
the tote bag wrong side out, press the side seam and the bottom seam of the bag
open with your hands to flatten the seams.
E. Pull
the corners of the bottom of the bag to create a flat bag bottom as shown in
the following figure. Match the bottom
seam to the side seam on one side of the bag and pin in place.
Match the bottom seam to the foldline on the other side of the bag and
pin in place.
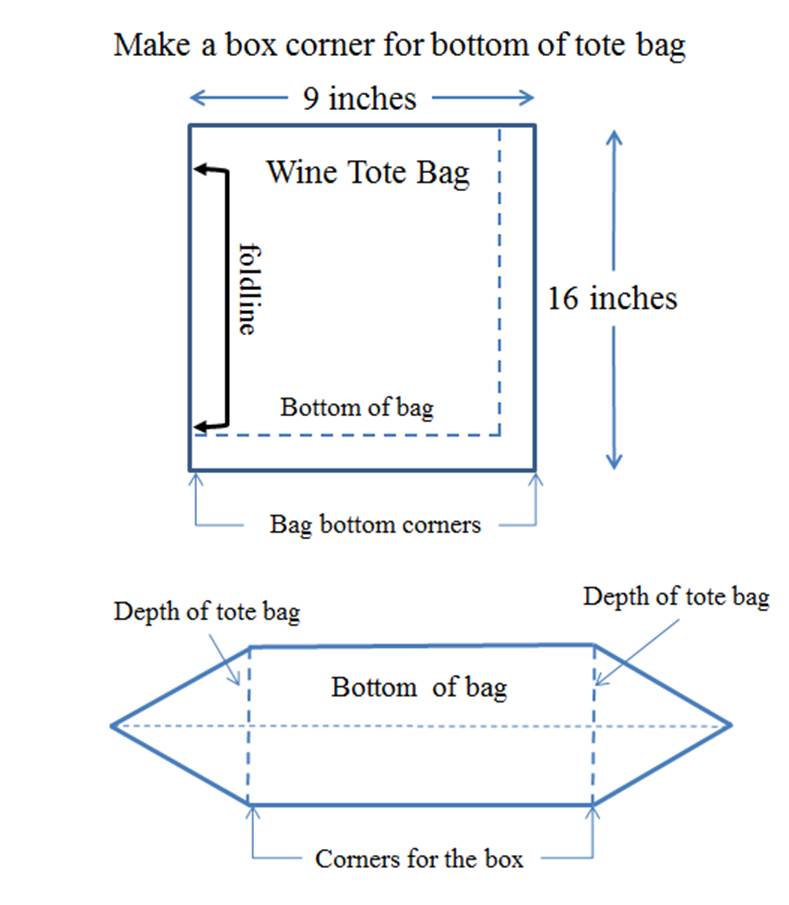
F. Box
corners will add depth to the tote bag.
To make the box corners, mark a stitch line that is 4 inches long and
centered on the bottom seam of the bag on both corners. Sew along this line to
form the box corners on the bottom of the tote bag.
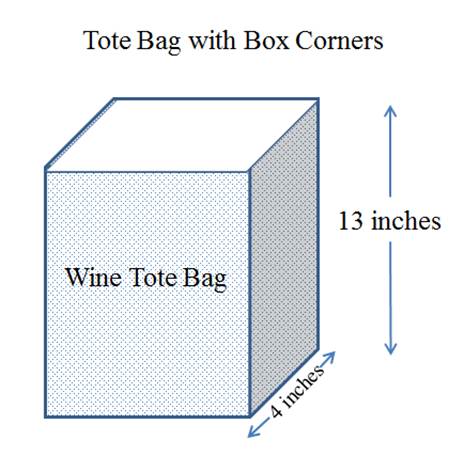
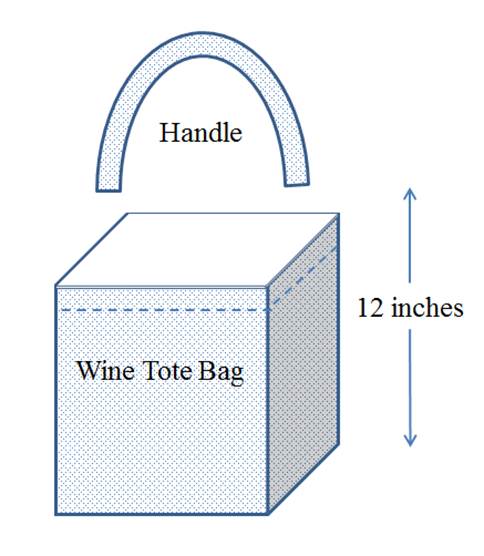
G. Turn
the bag right side out. Press the box
corners and the bottom edges flat with your
hands. Here is the right side out
wine tote bag.
H. If
desired, add fringe or other trim to the wine bag with top stitching on the
right side of the tote bag.
I. Measure
and mark a line 1 inch from the top of the tote bag. Fold the top of the bag to the inside along
this line. Top stitch as desired to
finish the top of the bag.
Step
5. Attach the handle to the wine tote
bag.
A. Measure
and mark 1 inch from each end of the tote bag handle.
B. The
handle will be attached at the center of two opposite sides of the bag. Measure and mark the center of two opposing sides
of the tote bag.
C. Place
1 inch of each end of the handle inside of the bag and pin it in place at the center
marks.
D. Use
at least two rows of top stitching to secure each end of the handle to the
bag.
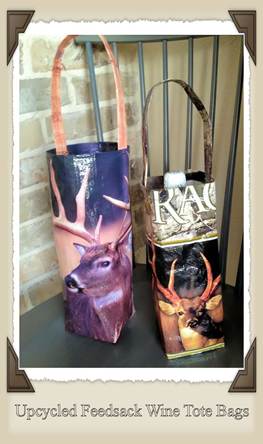
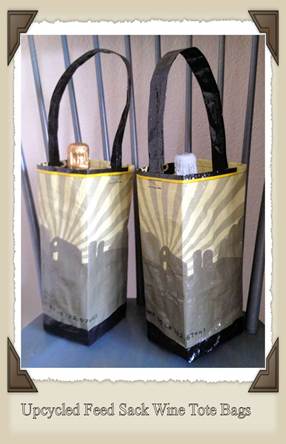
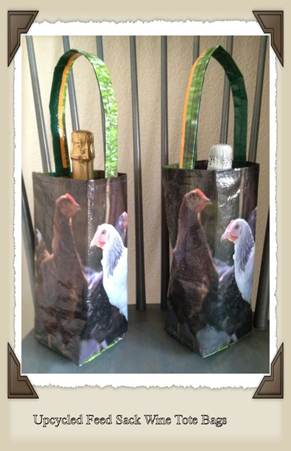
E. Here
are some examples of finished wine tote bags with different feed sack images.
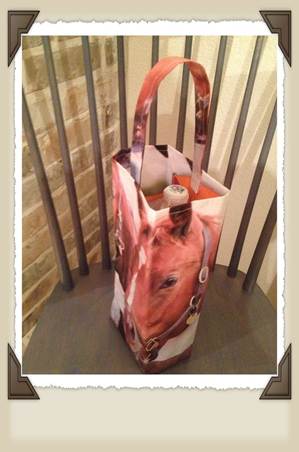
Large
Tote Bag
This is a large tote bag made
from woven polypropylene feed sack fabric.
This tote bag uses a full section of a feed sack; do not flatten the
feed sack. The tote has a roomy box
bottom and sturdy feed sack straps.
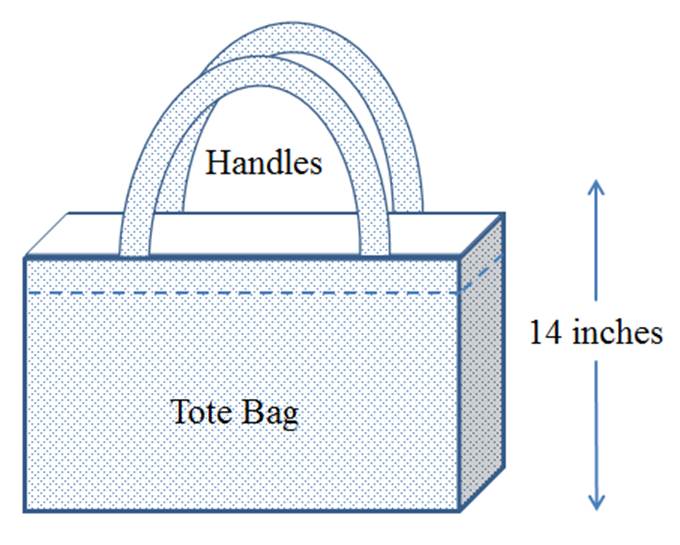
The finished tote bag width
is determined by the size of the feed sack.
The bag will be 14 inches high with 2 handles that are 1 inch wide and
extend 10 inches above the bag.
Instructions
Step 1. Clean the feed sack without opening the long seam in the back of the bag.
Step 2. Cut out the large tote bag and handles using the following dimensions. The body of the large tote bag is a section of the feed sack cut to the desired length.
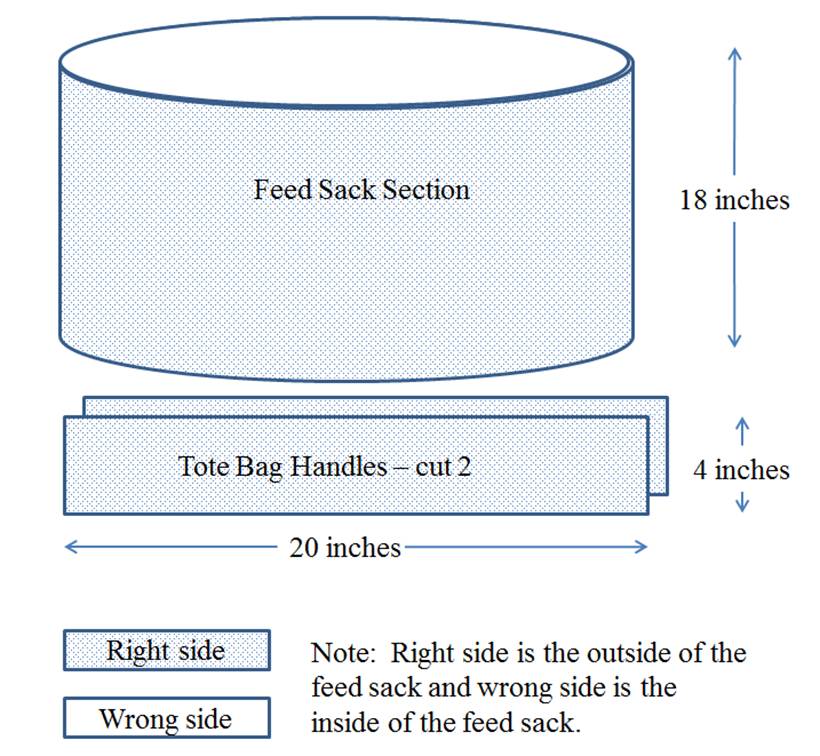
Step 3. Make the tote bag handle using the following
steps.
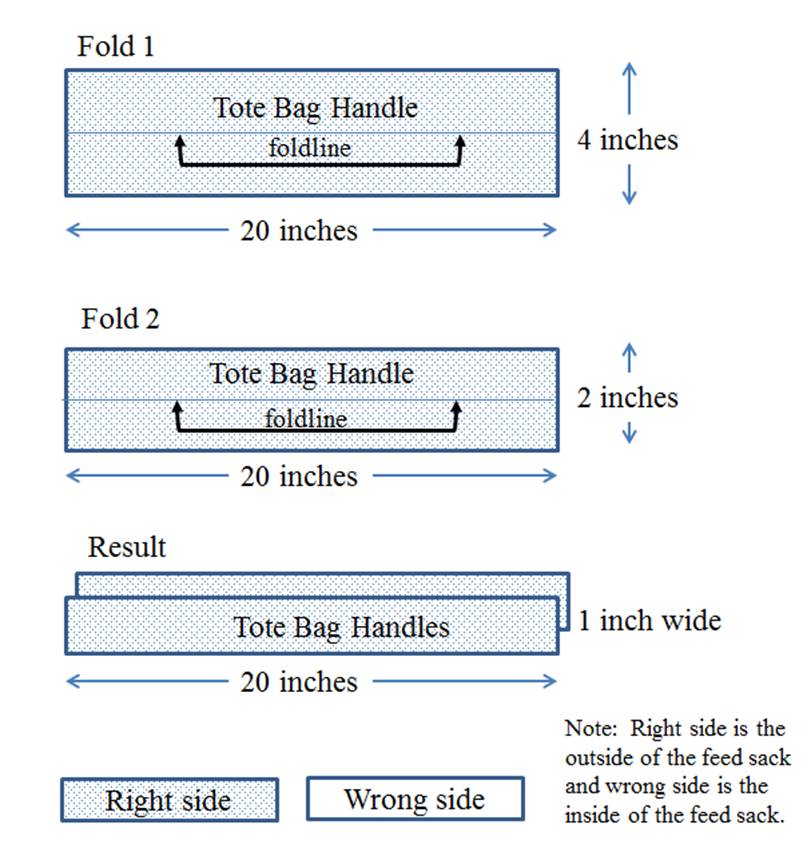
A. Fold
1: Fold the handle in half lengthwise
with the wrong sides together. The
handle will now be 20 inches long and 2 inches wide.
B. Use
your hands to press the fold flat.
C. Fold
2: Fold each unfinished edge of the
handle in half with wrong sides together to produce a handle that is 20 inches
long and 1 inch wide.
D. Use
your hands to press the folds flat.
E. Top
stitch the length of the handle. The top
stitching can be whatever pattern is desired.
At a minimum, a straight stitch should be used in the middle of the
handle to secure the folded sides of the handle.
Step
4. Make the large tote bag body using
the following steps.
A. Turn
the bag body wrong side out.
B. Fold
the bag flat with right sides together.
Make sure the desired feed sack imagery is centered on the front side of
the flattened bag.
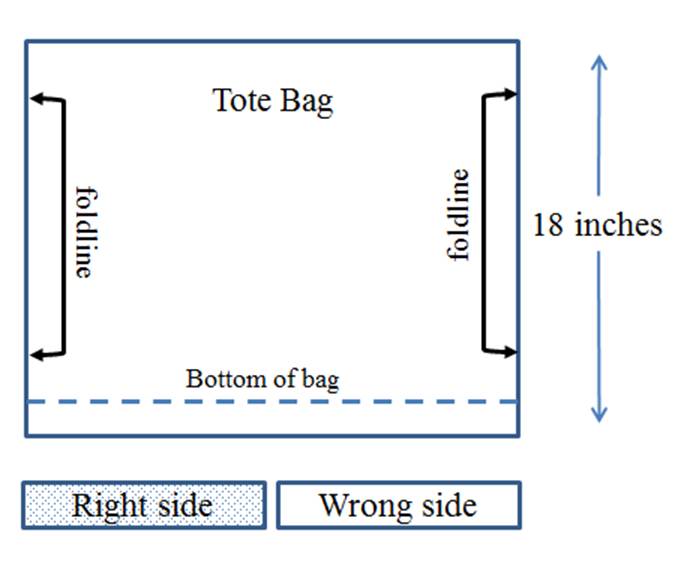
C. Measure
and mark a seam line 1 inch from unfinished bottom edge of the bag.
D. Securely
stitch the bottom seam. A double seam
can be used for a sturdy seam.
E. Press
the bottom seam of the bag open with your hands to make a flat seam.
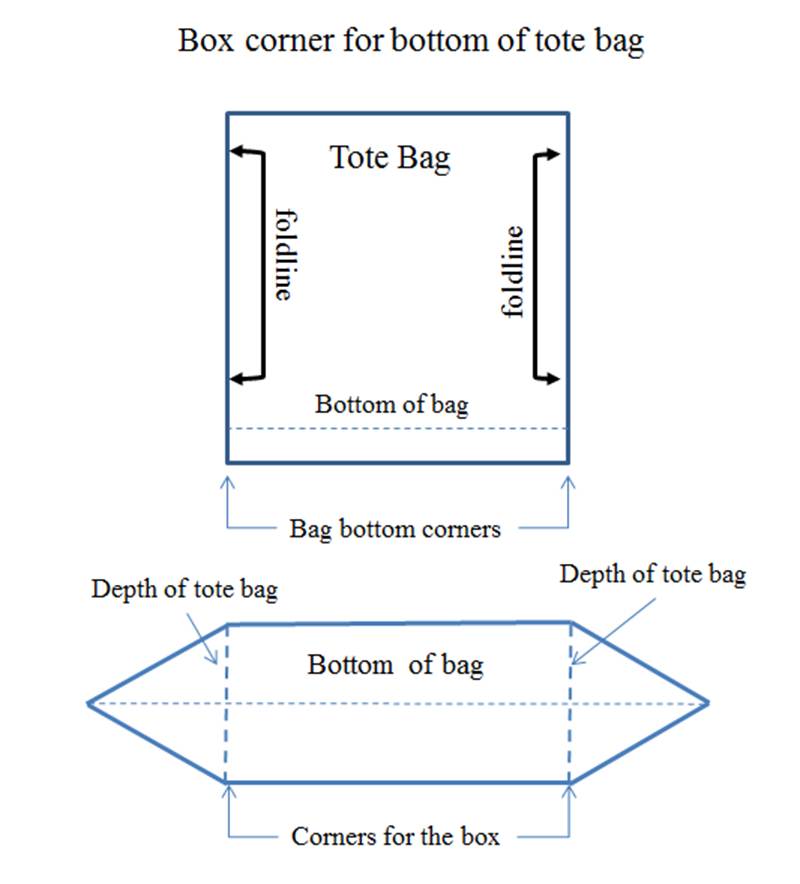
F. Pull
the corners of the bottom of the tote bag to create a flat bag bottom as shown
in the following figure. Match the bottom
seam to the foldline side seam on each side of the bag and pin in place.
G. To
add depth to the tote bag, mark a stitch line that is 4 inches long and
centered on the bottom seam of the bag on both sides. Sew along both lines to
form the box corners on the bottom of the tote bag.
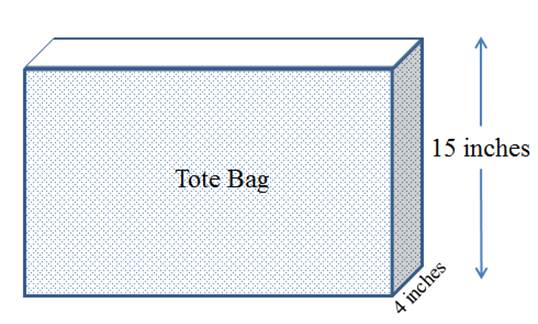
H. Turn
the bag right side out. Press the box
corners and the bottom edges flat with your
hands. Here is the right side out
tote bag.
I. If
desired, add fringe or other trim with top stitching on the right side of the
tote bag.
J. Measure
and mark a line 1 inch from the top of the tote bag. Fold the top of the bag to the inside along
this line. Top stitch as desired to
finish the top of the bag.
Step
5. Attach the handles to the large tote
bag.
A. Measure
and mark 1 inch from each end of the tote bag handle.
B. The
handles will be attached to the front and back of the bag. Measure and mark the center of the front and
back of the tote bag. Measure and place
a mark 4 inches on each side of the center mark on the front and back of the
bag.
C. On
the bag front, place 1 inch of the end of a handle inside of the bag and pin it
in place at the mark 4 inches to the left of the center mark. Place 1 inch of the other end of the handle inside of the bag front at
the mark 4 inches to the right of the center mark and pin it in place. Use at least two rows of top stitching to
secure each end of the handle to the bag.
D. Repeat
step H to attach the other handle to the back of the tote bag.
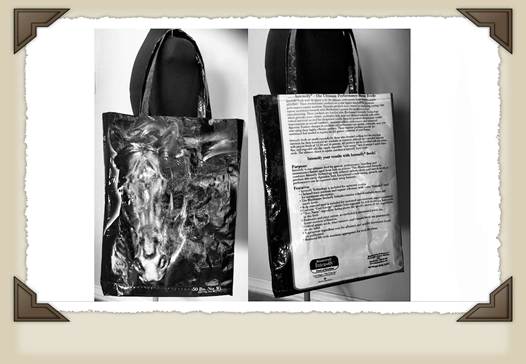
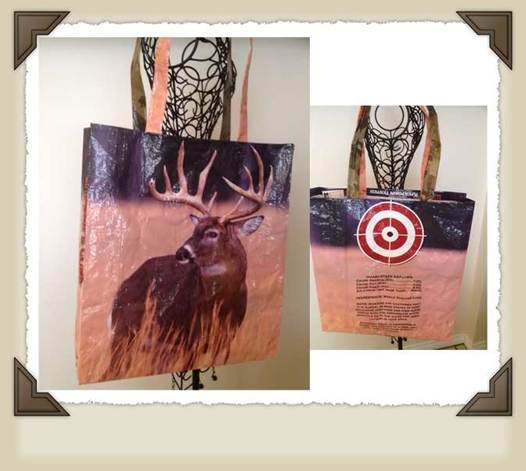
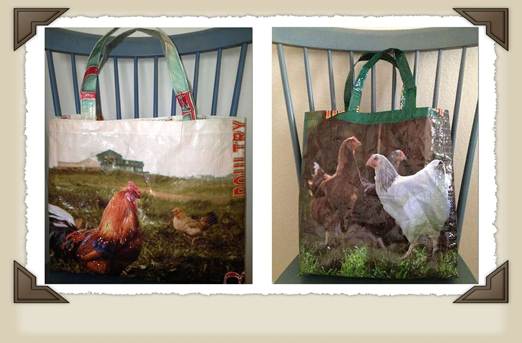
E. Here
are some examples of finished tote bags.
Each feed sack was selected for the beautiful imagery that could be
centered on the front of the tote bag.
Yoga Mat Tote Bag
This is a yoga mat tote bag
made from woven polypropylene feed sack fabric.
This pattern has strap loops at the top and bottom of the bag for
attaching an adjustable strap. You could
omit the strap loops and sew a strap directly to the top and bottom of the yoga
mat tote bag.
This bag easily holds a thick
8 mm mat. The height width of the yoga
mat tote can be adjusted to accommodate thicker mats.
Instructions
Step 1. Clean
and flatten the feed sack fabric using the Feed Sack Preparation Instructions.
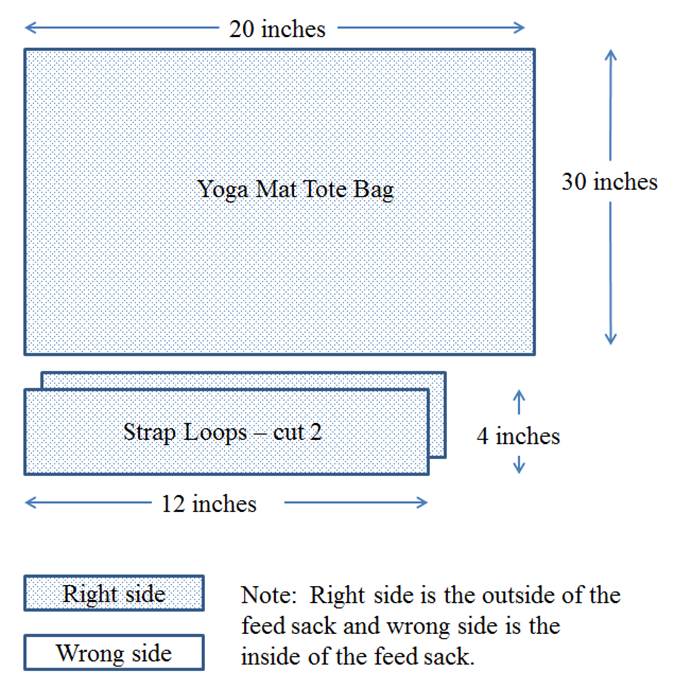
Step 2. Cut out
the yoga mat tote bag and straps for an adjustable handle using the following
dimensions.
Step 3. Make the yoga mat strap loops using the
following steps.
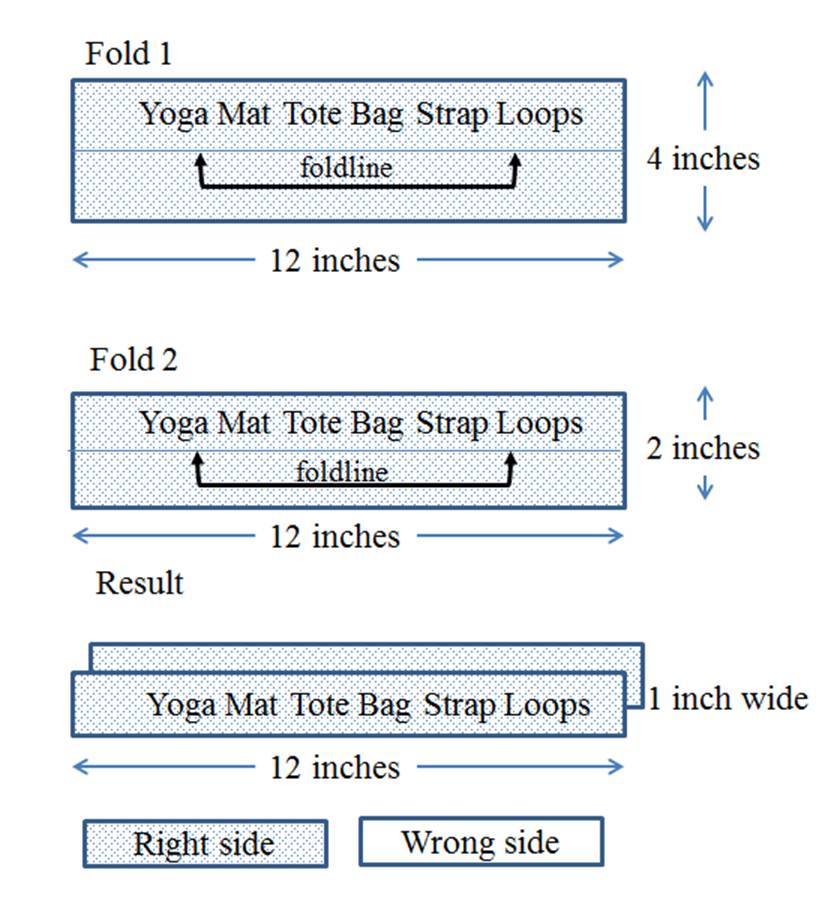
A. Fold
1: Fold each strap loop in half
lengthwise with the wrong sides together.
The strap loops will now be 12 inches long and 2 inches wide.
B. Use
your hands to press the folds flat.
C. Fold
2: Fold each unfinished edge of the
strap loops in half with wrong sides together to produce a strap loop that is
12 inches long and 1 inch wide.
D. Use
your hands to press the folds flat.
E. Top
stitch the length of each strap loop.
The top stitching can be whatever pattern is desired to secure the
folded sides.
Step
4. Make the yoga mat tote bag body using
the following steps.
A. Fold
the yoga mat bag flat lengthwise with right sides together.
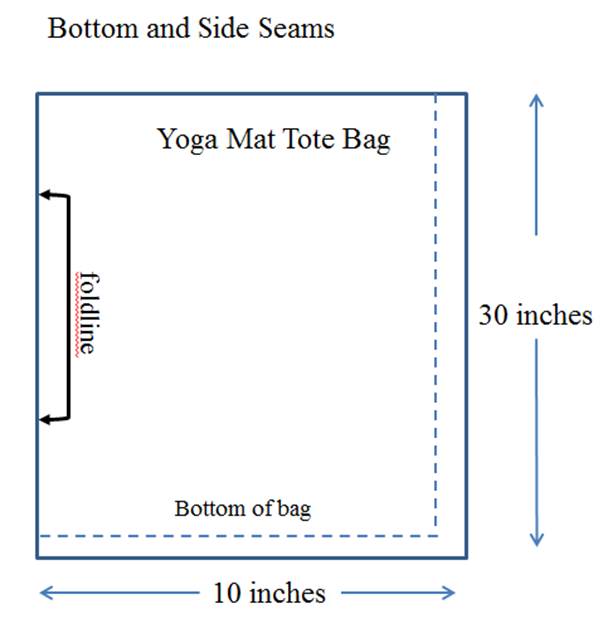
B. Measure
and mark a line 1 inch from unfinished bottom and side edge of the bag.
C. Stitch
the bottom and side seam along the marked line.
A double seam can be used for a sturdy seam.
D. Press
the seams of the bag open with your hands to make flat seams.
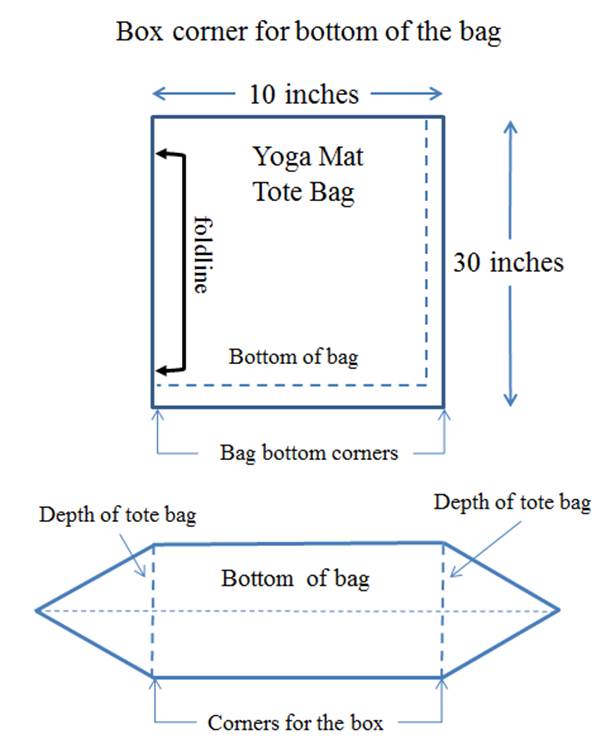
E. Pull
the corners of the bottom of the tote bag to create a flat bag bottom as shown
in the following figure. Match the
bottom seam to the foldline side seam on one side of the bag and pin in
place. Match the bottom seam to the side
seam on the other side of the bag and pin in place.
F. To
add depth to the tote bag, mark a box corner stitch line that is ¼ of the width
of the bag (4.5 inches for the pattern dimensions) and centered on the bottom
seam of the bag on both corners.
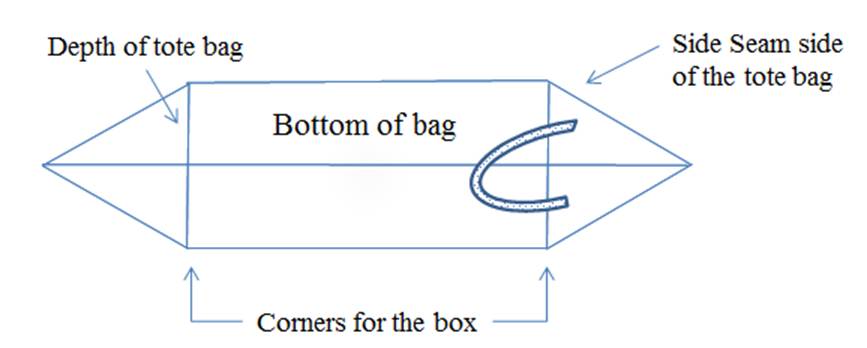
G. On
the right side of the tote bag (which is currently inside of the wrong side out
bag), center a strap loop into the box
corner seam on the side seam side of the tote bag as shown in the following
figure.
H. Sew
along the box corner stitch lines to form the box corners on the bottom of the
bag. Add extra stitching to reinforce
the strap loop seam.
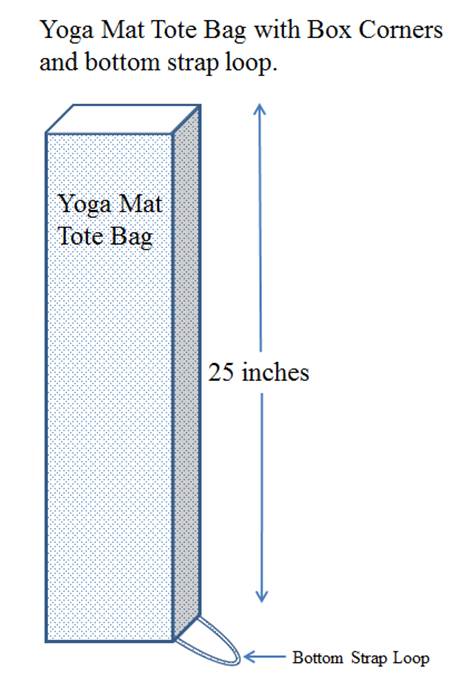
I. Turn
the bag right side out. Press the box
corners and the bottom edges flat with your
hands. Here is the right side out
tote bag.
J. If
desired, add fringe or other trim with top stitching on the right side of the
tote bag.
K. Measure
and mark a line1 inch from the top of the tote bag. Fold the top of the bag to the inside along
this line. Top stitch as desired to
finish the top of the bag.
Step
5. Attach the top strap loop and strap
to the yoga mat tote bag.
A. Measure
and mark 1 inch from each end of the remaining strap loop.
B. The
top strap loop will be attached to the side seam side of the bag top. Measure and mark 1 inch on each side of the
center seam on the side seam side of the bag top.
C. Center
the ends of the strap loop on the inside of the bag top using the marks 1 inch
on each side of the side seam. Pin one
end of the strap loop at each mark.
D. Use
at least two rows of top stitching to secure each end of the handle to the top
of the bag as shown in the following diagram of a completed yoga mat tote bag.
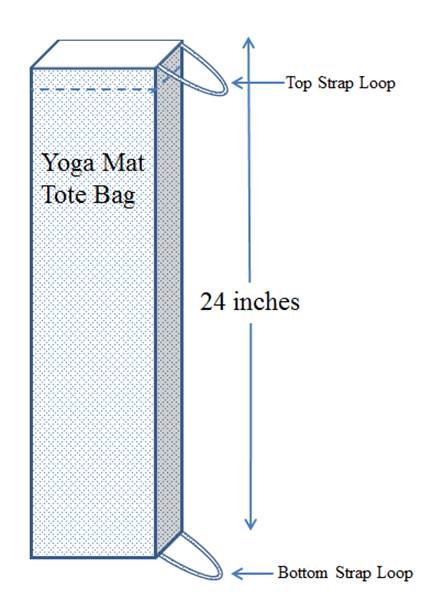
E. Attach
an adjustable strap to the yoga mat tote bag using the top and bottom strap
loops. If desired, a strap with an
adjustable buckle can be made of feed sack material.
F. Here
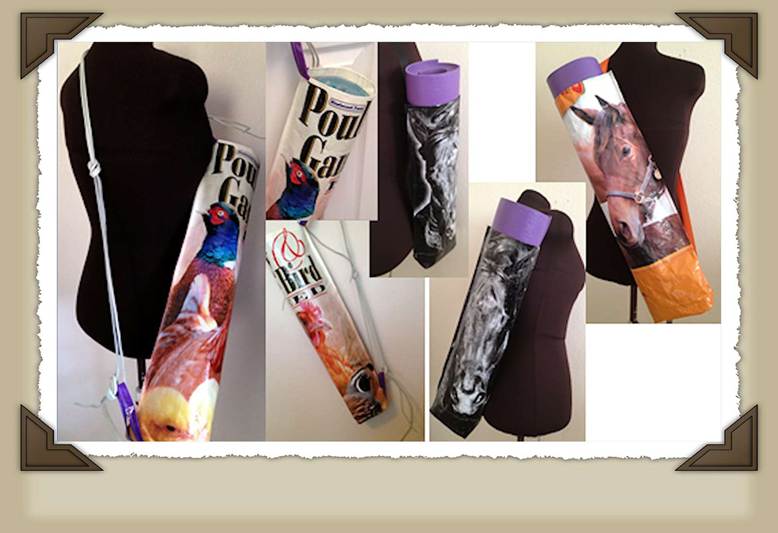
are some examples of completed yoga mat tote bags.